Oracle BI SE1 Services
June 20, 2009
To use Oracle Application Server we should start OC4J which can be done by “Start OC4J” and shutting it down by CTRL+C in the OC4J console.
And to completely shutdown the remaining services that BI uses:
net stop OracleServiceBISE1DB
net stop OracleDBConsolebise1db
net stop “Oracle BI Server”
net stop “Oracle BI Presentation Server”
net stop “Oracle BI Java Host”
This will stop the services and freeing your machine’s memories.
To start the services again just use the following commands:
net start OracleServiceBISE1DB
net start OracleDBConsolebise1db
net start “Oracle BI Server”
net start “Oracle BI Presentation Server”
net start “Oracle BI Java Host”
To make things easier, make .bat files and paste this commands.
**
If you can not start OracleDBConsolebise1db service then you should try this at cmd:
SET ORACLE_SID = bise1db
EMCTL START dbconsole
It will give you the error message, “/oc4j/j2ee/OC4J_DBConsole_118.136.27.180_bise1db not found.”
Go to “/oc4j/j2ee/” copy folder “OC4J_DBConsole_?????_bise1db” and rename it to “OC4J_DBConsole_118.136.27.180_bise1db”. Now start your dbconsole again.
Note: Adjust your ORACLE_SID and the missing folder name to yours
Problem with USB 2.0 Driver
April 10, 2009
Recently I got my USB Driver downgraded from 2.0 to slower speed (1.1?). I think it happened when I plugged my friend’s external harddrive to my computer and it caused some error. So everytime I plugged my USB storage, the Windows pop this message :
The USB Driver installed at that time :

Now, the solution to fix the Driver back into USB 2.0 Driver:
- Go to your BIOS, make sure the “USB 2.0” is enabled
- Go to device manager Open the Universal Serial Bus Controllers (like above picture)
- Uninstall the USB Drivers
- Restart
- Your Windows (XP SP1) will install the proper drivers now
Result:

HTS Programming 2
March 1, 2009
A year and a half ago, I played this hts game. It’s kinda addicting for me : ), learnt new stuffs, etc. And I reached Programming 2, with a little programming skill I tried to finish this and end up not knowing what to do. I didn’t want to skip the level so I didn’t continue to further levels, but I promised to my self to finished this level someday with C or C++. Eventually I just forgot about hts, but a couple days ago I suddenly remembered about this, so I gave it a try again. And I did it ; ). Yey I kept that promise ( although I took a year and a half to keep it ).
#include “CImg.h”
#include
#include
#include
using namespace cimg_library;
using namespace std;
const string morse[] = {
“.-“, “-…”, “-.-.”, “-..”, “.”, “..-.”, “–.”, “….”, “..”,
“.—“, “-.-“, “.-..”, “–“, “-.”, “—“, “.–.”, “–.-“, “.-.”,
“…”, “-“, “..-“, “…-“, “.–“, “-..-“, “-.–“, “–..”, “.—-“,
“..—“, “…–“, “….-“, “…..”, “-….”, “–…”, “—..”, “—-.”,
“—–”
};
const char alphabet[] = {
‘A’, ‘B’, ‘C’, ‘D’, ‘E’, ‘F’, ‘G’, ‘H’, ‘I’, ‘J’, ‘K’, ‘L’, ‘M’,
‘N’, ‘O’, ‘P’, ‘Q’, ‘R’, ‘S’, ‘T’, ‘U’, ‘V’, ‘W’, ‘X’, ‘Y’, ‘Z’,
‘1’, ‘2’, ‘3’, ‘4’, ‘5’, ‘6’, ‘7’, ‘8’, ‘9’, ‘0’,
};
// Dummy WriteFunction
size_t dummy (void* , size_t size, size_t nmemb, void*){
return size*nmemb;
}
// Get Ascii value of specific x,y
int getAsciiValue( int x, int y, int& curr, int& prev ){
int result;
curr = x + (100*y);
result = curr – prev;
prev = curr;
return result;
}
// Return a string contains TEXT of the datamorse
string getText( string datamorse ){
string temp, datatext;
int i=0,j=0;
for( i=0; i
char *url2 = “http://www.hackthissite.org/missions/prog/2/“;
char *url3 = “http://www.hackthissite.org/missions/prog/2/PNG/“;
char *url4 = “http://www.hackthissite.org/missions/prog/2/index.php“;
char *postdata = “username=USERNAME&password=PASSWORD&btn_submit=Login”; //change USERNAME and PASSWORD to yours
char *cookiefile = “tempcookie”;
/*Logging in and retrieving the image*/
curl = curl_easy_init();
if( curl ){
curl_easy_setopt(curl, CURLOPT_COOKIEFILE, cookiefile); // Enable cookies
curl_easy_setopt(curl, CURLOPT_FOLLOWLOCATION, 1); // Follow HTTPresponse redirections
curl_easy_setopt(curl, CURLOPT_WRITEFUNCTION, dummy); // Disable CURL output to stdout
curl_easy_setopt(curl, CURLOPT_POSTFIELDS, postdata); // Send Post data
curl_easy_setopt(curl, CURLOPT_URL, url); // Setting target url
// Connect to target (login)
result = curl_easy_perform(curl);
if( result ){
cout << "Cannot connect to site, check your url!\n";
}
// Setting new target url
curl_easy_setopt(curl, CURLOPT_URL, url2);
// Connect to target (mission page)
result = curl_easy_perform(curl);
if( result ){
cout << "Cannot connect to site, check your url!\n";
}
// Open file
fp = fopen("PNG.png", "wb");
if( fp == NULL ) cout << "File cannot be opened";
curl_easy_setopt(curl, CURLOPT_WRITEFUNCTION, NULL); // Set to default stdout
curl_easy_setopt(curl, CURLOPT_WRITEDATA, fp); // store stdout to file
curl_easy_setopt(curl, CURLOPT_URL, url3); // Setting new target Url
// Grab image
imgresult = curl_easy_perform(curl);
if( imgresult ){
cout << "Cannot grab the image!\n";
}
// Close the file
fclose(fp);
}
/*End of Logging in and retrieving the image*/
/*Open PNG file, read morsecode, decode and write the TEXT*/
CImg
string datamorse, answer;
int x=0,y=0;
int curr=0, prev=0;
for( y=0; y<30; y++ ){ for( x=0; x<100; x++ ){ if( img(x,y,0,0) == 255 ){ datamorse.push_back(getAsciiValue(x,y,curr,prev)); // If at x,y the pixel has RED value == 255 it gets the AsciiValue and store it to datamorse } } } cout << datamorse << endl; answer = getText(datamorse); cout << answer << endl; /*End of Open PNG file, read morsecode, decode and write the TEXT*/ /*Answering the Mission*/ fpResult = fopen("htsresult.htm", "wb"); // Opening file to write the final result if( fp == NULL ) cout << "File cannot be opened"; char tempanswer[answer.length()+2]; // Make an empty array for tempanswer stringToChar(answer, tempanswer); // Move answer value to tempanswer char postanswer[100] = "solution="; strcat(postanswer, tempanswer); // "solution="+tempanswer strcat(postanswer, "&submitbutton=submit"); // "solution="+tempanswer+"&submitbutton=submit" curl_easy_setopt(curl, CURLOPT_URL, url4); // Setting new target Url curl_easy_setopt(curl, CURLOPT_WRITEDATA, fpResult); // store stdout of the final result to file htsresult.htm curl_easy_setopt(curl, CURLOPT_POSTFIELDS, postanswer); // Fill Post data with the answer // Posting the answer result = curl_easy_perform(curl); if( result ){ cout << "Cannot connect to site, check your url!\n"; } // Clean up curl's the resources curl_easy_cleanup(curl); /*End of Answering the Mission*/ return 0; } [/sourcecode]
It will connect to hts site and log in using USERNAME and PASSWORD. Retrieve Programming 2 PNG file, retrieve the morse code, decode it to text, submit the answer. This program will generate PNG.png file and htsresult.htm file which contains your result for that challenge.
Note:
- When compiling be sure to link the necessary library that cURL and CImg need.
- It seems WordPress try to make the url a hyperlink even though I use sourcode tag, just get rid of it all leaving only the url.
Using cURL in MinGW
March 1, 2009
curl is a command line tool for transferring files with URL syntax, supporting FTP, FTPS, HTTP, HTTPS, SCP, SFTP, TFTP, TELNET, DICT, LDAP, LDAPS and FILE. curl supports SSL certificates, HTTP POST, HTTP PUT, FTP uploading, HTTP form based upload, proxies, cookies, user+password authentication (Basic, Digest, NTLM, Negotiate, kerberos…), file transfer resume, proxy tunneling and a busload of other useful tricks.
- You can download the curl library for C in the website: http://curl.haxx.se/ . I use curl-7.19.3.zip .
- Extract the file so it’s all in same folder (I assume the folder name as curl).
- Navigate to that folder through command line and use mingw32-make mingw32 command.
- The command will generate files in /curl/lib folder.
- Now you can test it by compiling the example in /curl/docs/examples/
- Navigate to /curl/docs/examples
- Compile using gcc -DCURL_STATICLIB -I ../../include -L ../../lib simple.c -o simple -lcurl -lws2_32 -lwinmm
- Run the executeable file simple and you will see the html file you’ve successfully fetched.
Note:
- Use -DCURL_STATICLIB (I will post more about this when I know about dynamic/static library)
- Make sure the compiler know where to search the curl’s include and lib folder
- Library needed : curl, ws2_32, winmm
Using CImg in MinGW
March 1, 2009
The CImg Library is an open source C++ toolkit for image processing designed with these properties in mind: Usefulness, Genericity, Portability, Simplicity, Extensibility, Freedom.
You can see the details and download it at http://cimg.sourceforge.net/
To use this, first you need to download the library ( I’m using CImg-1.3.0.zip as I’m writing this post). After your download the library, you will get a bunch of stuff: documentations, examples, resources, etc. The one you need is only the CImg.h.
Move it your MinGW include folder or your can just include it at compile time ( using -I as in i not L ). Now you are ready to code using CImg. : )
#include "CImg.h"

using namespace cimg_library;

int main(int argc, char *argv[]) {
    CImg<unsigned char> img(640,400,1,3);            // Define a 640x400 color image with 8 bits per color component.
    img.fill(0);                                       // Set pixel values to 0 (color : black)
    unsigned char purple[] = { 255,0,255 };         // Define a purple color
    img.draw_text(100,100,"Hello World",purple,0,1,35); // Draw a purple "Hello world" at coordinates (100,100).
    img.display("My first CImg code");               // Display the image in a display window.
    return 0;
}
Note:
- Use cimg_library namespace to help writing your code
- When compiling, be sure the compiler found CImg.h
- When compiling, link it to gdi32 library
- If you want to use CImg to open image file such as (JPEG, PNG, etc) you have to install other library such as ImageMagick that CImg uses. To download ImageMagick visit the site : http://www.imagemagick.org/. I installed version ImageMagick-6.4.9-7-Q16-windows-static.exe
Installing MinGW
February 27, 2009
Files needed:
- binutils (binutils-2.17.50-20060824-1.tar.gz)
- gcc-core (gcc-core-3.4.5-20060117-3.tar.gz)
- mingw-runtime (mingwrt-3.15.1-mingw32.tar.gz)
- w32api (w32api-3.12-mingw32-dev.tar.gz)
Optional:
- gcc-g++ (gcc-g++-3.4.5-20060117-3.tar.gz)
- mingw32-make (mingw32-make-3.81-20080326-2.tar.gz)
- etc
*the green text are the version that I use when writing this post
To download those files, visit http://www.mingw.org/ and check for the latest releases.
After finished downloading those files, simply extract all the files in a folder. When choosing the “Destination Folder” for the installation, please consider not installing MinGW in a path that contains spaces. (C:/MinGW)
Add your PATH variable with the installation folder (C:/MinGW)
To compile your code
g++ foo.c -o bar.exe
Rangkuman Operation System Programming (sm.5)
January 23, 2009
- Fork
- Unamed Pipe & Named Pipe
- Shared Memory
- Semaphore
Jika suatu process(parent) menggunakan fungsi fork(), maka suatu process(child) baru akan terbentuk yang merupakan process yang identik dengan parent-process yang memanggilnya. Child-process yang baru terbentuk akan mendapatkan PID baru dan memiliki PPID yang sama dengan PID pada parent-process. Process ini dapat dibedakan dengan menggunakan fungsi getpid() yang akan mengembalikan PID child-process bila dipanggil pada parent-process dan mengembalikan 0 jika dipanggil pada child-process. Setelah itu dapat dilakukan flow-control untuk melakukan tugas masing-masing pada child/parent process.
Tujuan dari melakukan fork() yang saya tangkap untuk saat ini adalah untuk menjalankan/membentuk process melalui suatu process yang berjalan.
Advanced programmers often use multiple cooperating processes in a single application to enable the application to do more than one thing at once, to increase application robustness, and to make use of already-existing programs.
(Unamed&Named) Pipe merupakan salah satu dari metoda IPC(Interprocess Communication). Tujuan dilakukannya IPC adalah agar antara process satu dengan process yang lain dapat salin berkomunikasi seperti pertukaran data dan lainnya. Metoda untuk melakukan IPC ada beberapa seperti Pipe, SharedMemory, Sockets, etc.
Dengan menggunakan Pipe maka dua process yang berbeda dapat (berkomunikasi) bertukar data satu sama lainnya. Dengan gambaran process membentuk suatu jalur antar process yang mana dari jalur ini dapat ditulis / dibaca data, sehinga terjadi pertukaran antar process. Ada dua jenis pipe yaitu
- UnamedPipe (pipe();)
- NamedPipe (mkfifo();)
dimana masing-masing memiliki karakterisiknya masing-masing.
A pipe’s data capacity is limited. If the writer process writes faster than the reader process consumes the data, and if the pipe cannot store more data, the writer process blocks until more capacity becomes available. If the reader tries to read but no data is available, it blocks until data becomes available.Thus, the pipe automatically synchronizes the two processes.
SharedMemory merupakan salah satu metoda IPC lainnya yang dapat digunakan. Dengan gambaran pertama-tama dengan membentuk shmid(memesan suatu alamat) dengan shmget(), lalu meng-attach suatu pointer kepada shmid tersebut. Process yang ingin ikut menggunakan alamat memory tersebut secara bersamaan dapat meng-attach pula suatu pointer kepada shmid yang sama. Dengan adanya pointer yang menunjuk kepada shared memory maka process-process tersebut dapat mengakses suatu alamat memory yang sama, dengan ini dapat terjadi komunikasi antar process.
Pro and cons
Shared memory segments permit fast bidirectional communication among any number of processes. Each user can both read and write, but a program must establish and follow some protocol for preventing race conditions such as overwriting information before it is read. Unfortunately, Linux does not strictly guarantee exclusive access even if you create a new shared segment with IPC_PRIVATE.
Also, for multiple processes to use a shared segment, they must make arrangements to use the same key.
Seperti yang disebutkan diatas bahwa untuk menggunakan shared memory pada beberapa process, diperlukan suatu protocol untuk membentuk suatu pengaturan agar tidak terjadi race condition dan overlapping dalam penggunaan memory tersebut secara bersamaan, terdapat suatu metoda untuk membantu shared memory membentuk protocol tersebut yaitu dengan menggunakan Semaphore.
Semaphore dapat digambarkan sebagai suatu counter yang dapat dilakukan operasi penjumlahan dan nilainya dijadikan patokan untuk sinkronisasi antar process. Nilai pada semaphore tidak dapat berupa negatif. Contoh penggunaan semaphore adalah pada kasus produsen dan konsumen. Dimana konsumen dapat menggambil barang jika produsen sudah memproduksinya dan menaruhnya pada stock barang. Dengan menggunakan semaphore kita membuat suatu set perintah pada produsen untuk {menghasilkan barang lalu meng-set counter +1} dan pada konsumen {meng-set counter -1 lalu mengambil barang}. Maka jika konsumen berusaha untuk {meng-set counter -1 lalu mengambil barang} pada saat counter = 0, maka process konsumen akan terhenti sementara (paused) hingga produsen {menghasilkan barang lalu meng-set counter +1}. Ketika produsen telah mengerjakan perintah tersebut maka counter = 1, sehingga process konsumen dapat berjalan mengambil barang dan counter pun akan menjadi = 0 lagi.
Contoh (click pada link dibawah untuk mendownloadnya):
P.S: Tulisan diatas berdasarkan pemikiran dan kesimpulan menurut penulis saja. Tidak ada jaminan 100% benar, malah dijamin 100% tidak benar semua, kalau ada yang mau koreksi dipersilahkan dengan senang hati 😉
Using OpenGL Utility Toolkit with .NET 2003
September 21, 2008
Since I have to try GLUT, I’ll make this guide how to use them.
Required Files:
- glut32.dll
- glut32.lib
- glut.h
- Microsoft Visual Studio .NET 2003
You can get glut32.dll, glut32.lib and glut.h from http://www.xmission.com/~nate/glut.html , get glut-3.7.6-bin.zip (117 KB).
Next step is to move the files to these locations :
- glut32.dll -> \WINDOWS\system32
- glut32.lib -> \Program Files\Microsoft Visual Studio NET 2003\Vc7\PlatformSDK\Lib
- glut.h -> \Program Files\Microsoft Visual Studio NET 2003\Vc7\PlatformSDK\Include\gl
Now that we’ve installed the glut, it’s time to test some simple code.
- Open your Visual Studio .NET 2003
- Press Ctrl+Shift+N
- Select Visual C++ ( Win32 Console Project ) and name your project

- Click Application Settings and Check Empty Project box

- Next step is adding the code, press Ctrl+Shift+A, select C++ File, and name it.

- In the blank .cpp file, type / paste your code

- Run your project


I will try to update this Post when I have a better understanding of OpenGL. 
End of Post
Blue Screen on Fresh Windows Installation
March 21, 2008
Beberapa bulan yang lalu, Hard Disk Seagate 40Gb yang uda berusia sekitar 4-5 tahun punya saya akhirnya mulai rewel. Hard Disk ini saya gunakan pada Computer pertama saya. Keadaan Hard Disk pada waktu itu :
- Seagate 40Gb (C:\) (D:\)
- WDC [Westren Digital] 80Gb (E:\) (F:\) (G:\)
Dengan Windows terinstalasi pada C:\, partisi lainnya berisikan file-file. Seagate diset sebagai Primary, WDC diset sebagai Secondary. Kondisi kable IDE : [MotherBoard]======[Seagate]===[WDC]
Pada saat digunakan, mendadak Windows Freeze, lalu saya hard reset, saat booting Windows kembali terdapat Blue Screen sesaat lalu komputer auto-reboot. Setelah itu, saya coba untuk fresh install Windows menggunakan Bootable Cd Windows.
Semua berjalan lancar, tetapi beberapa minggu kemudian hal yang sama terjadi lagi. Windows kembali freeze, setelah di Hardreset, Windows melakukan DiskCheck, di DiskCheck ditulis bahwa adanya Bad Sector, Sector tersebut dipisahkan / direpair, setelah itu saya dapat masuk kembali kedalam Windows, tetapi beberapa saat kembali Freeze dan saat Booting kembali muncul Blue Screen diikuti Auto-reboot.
Kembai saya coba install ulang Windows, tetapi muncul keanehan bahwa saat tampilan pemilihan Partisi mana yang akan diinstal Windows, partisi C:\ saya tertulis Space : 20Gb, Free Space : 20Gb. Dari sini saya berkesimpulan Partisi C:\ saya pada Seagate mengalami bad sector kembali.
Dari sini saya mencoba untuk menginstall Windows pada WDC saya. Jumper WDC saya set sebagai ‘Master or Single’ dan Seagate saya lepas dahulu untuk sementara.Dulu saya pernah mencobanya tetapi muncul pesan error dan kemarin saya mencobanya lagi dan error yang sama muncul kembali. Pertama saya memilih partisi untuk diinstall windows dan windows men-format lalu mencopy file instalasi, sampai saat ini baik-baik saja lalu windows reboot, tetapi saat setelah itu, begituh loading windows bar menuju instalasi windows, muncul pesan error :
Stop : c0000221 Unknown hard error
\Systemroot\System32\ntdll.dll
Lalu saya mencoba untuk mengulang instalasi, saat instalasi ke2, saya berhasil menginstall windows, tetapi saat mau masuk ke windows untuk pertama kali, langsung muncul Blue Screen untuk sesaat diikuti auto-reboot. Saya mencoba untuk memasukki Safe Mode, ternyata bisa. Saya coba lagi memasuki Normal Mode tetapi tetap tidak bisa.
Lalu saya coba untuk mengganti urutan cable IDE saya dari :
[MotherBoard]========[’empty’]====[WDC]
menjadi:
[MotherBoard]========[WDC]====[’empty’]
Saya coba lakukan fresh install windows sekali lagi dan ternyata kali ini instalasi berjalan mulus sampai masuk ke windows.
Lalu saya coba mount Seagate saya, dengan set Jumper sebagai slave, jadi kondisi sekarang :
[Motherboard]========[WDC]====[Seagate]
Saat boot kembali, ternyata Windows lagi-lagi melakukan CheckDisk terhadap partisi C:\ [sekarang G:\] pada Seagate. Setelah itu saya dapat masuk kedalam Windows, file-file saya masih tetap ada pada C:\ [sekarang G:\] dan D:\ [sekarang H:\] pada harddisk Seagate saya.
Sekarang Computer baru berjalan lancar selama 2 hari, akan saya pantau, dan nanti saya akan mencoba menggunkana software HDD Regenerator untuk memeriksa + merepair Seagate saya.
VPN ( Virtual Private Network ) with Hamachi
March 2, 2008
Ok baru-baru ini ada temen saya yang ngajakin maen Warcraft 3 ( Dota ) via Hamachi . Pertama sich saya rada pesimis apakah bakal bisa pada maen? Ya sudah, saya coba aja pikir gw. Download Hamachi , lalu install seperti layaknya software biasa.
Lalu jalankan Hamachi dan klik pada tombol ke 2 dari kanan di sebelah bawa layar Hamachi. Disini kamu bisa Create atau Join suatu Network. Anda bisa membuat Network anda dengan memilih “Create a new network…”, masukkan nama network anda dan masukan password untuk bisa join ke dalam network tersebut.
Untuk masuk kedalam suatu Network, anda dapat memilih “Join an existing network…”. Masukkan nama network dan passwordnya, lalu anda akan join pada network tersebut, jika sudah join maka pada layar Hamachi anda akan ada nama Network yang ada join berikut juga anggota dari Network tersebut seperti pada gambar berikut :

Warna hijau menunjukkan anggota Network yang sedang Online.
Warna abu-abu menunjukkan anggota Network yang sedang Offline.
Tanda bulat pada anggota menunjukkan bahwa anggota tersebut menggunakan free-mode.
Tanda bintang pada anggota menunjukkan bahwa anggota tersebut menggunakan premium-mode.
Pada window Hamachi anda dapat memakai beberapa fungsi yang ada, diantaranya :
- Membuka layar chat antar anggota
- Membuka layar chat untuk satu Network
- Mengshare file antar anggota
- Melakukan Ping terhadap anggota
- dll
Lalu untuk bermain Warcraft 3 masuk ke dalam client Warcraft anda dan pilih Local Area Network. Anda bisa create ataupun join layaknya seperti sedang berada dalam 1 jaringan LAN.

Lalu tinggal bermain dech (^_-).
Bagi yang mengalami kesulitan untuk melihat room antar anggota ( tidak bisa melihat room anggota, ataupun anggota tidak dapat melihat room yang kita buat) maka ada baiknya mengikuti solusi ini:
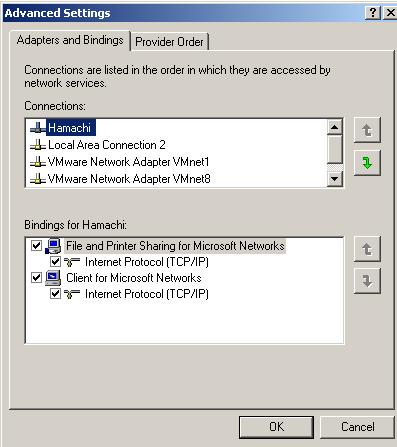
- Start -> Settings -> Controll Panel -> Network Connections -> Advanced ->Advanced Settings

- Lalu pada window yang terbuka, pindahkan koneksi Hamachi menjadi paling atas

- Restart Computer anda

Dengan mengikuti langkah diatas semoga masalah sudah dapat teratasi.
Hamachi merupakan suatu Software yang dapat membentuk Jaringan Semu(VPN) melalui perantara Internet. Terbukti dengan menggunakan VPN, saya ( DL: 384kbps UL: 55kbps ) sebagai host dalam permainan Dota 3 vs 3, hasilnya cukup memuaskan dimana permainan dapat berjalan dengan lancar.


